

The flow differs by mode. In restaurant mode, you send items to the
kitchen first, then take payment — with the option to split the check. In
retail mode, you pay for the cart directly, in one go. The relevant
sections call this out.
Opening the pay screen
In restaurant mode
1
Open the order
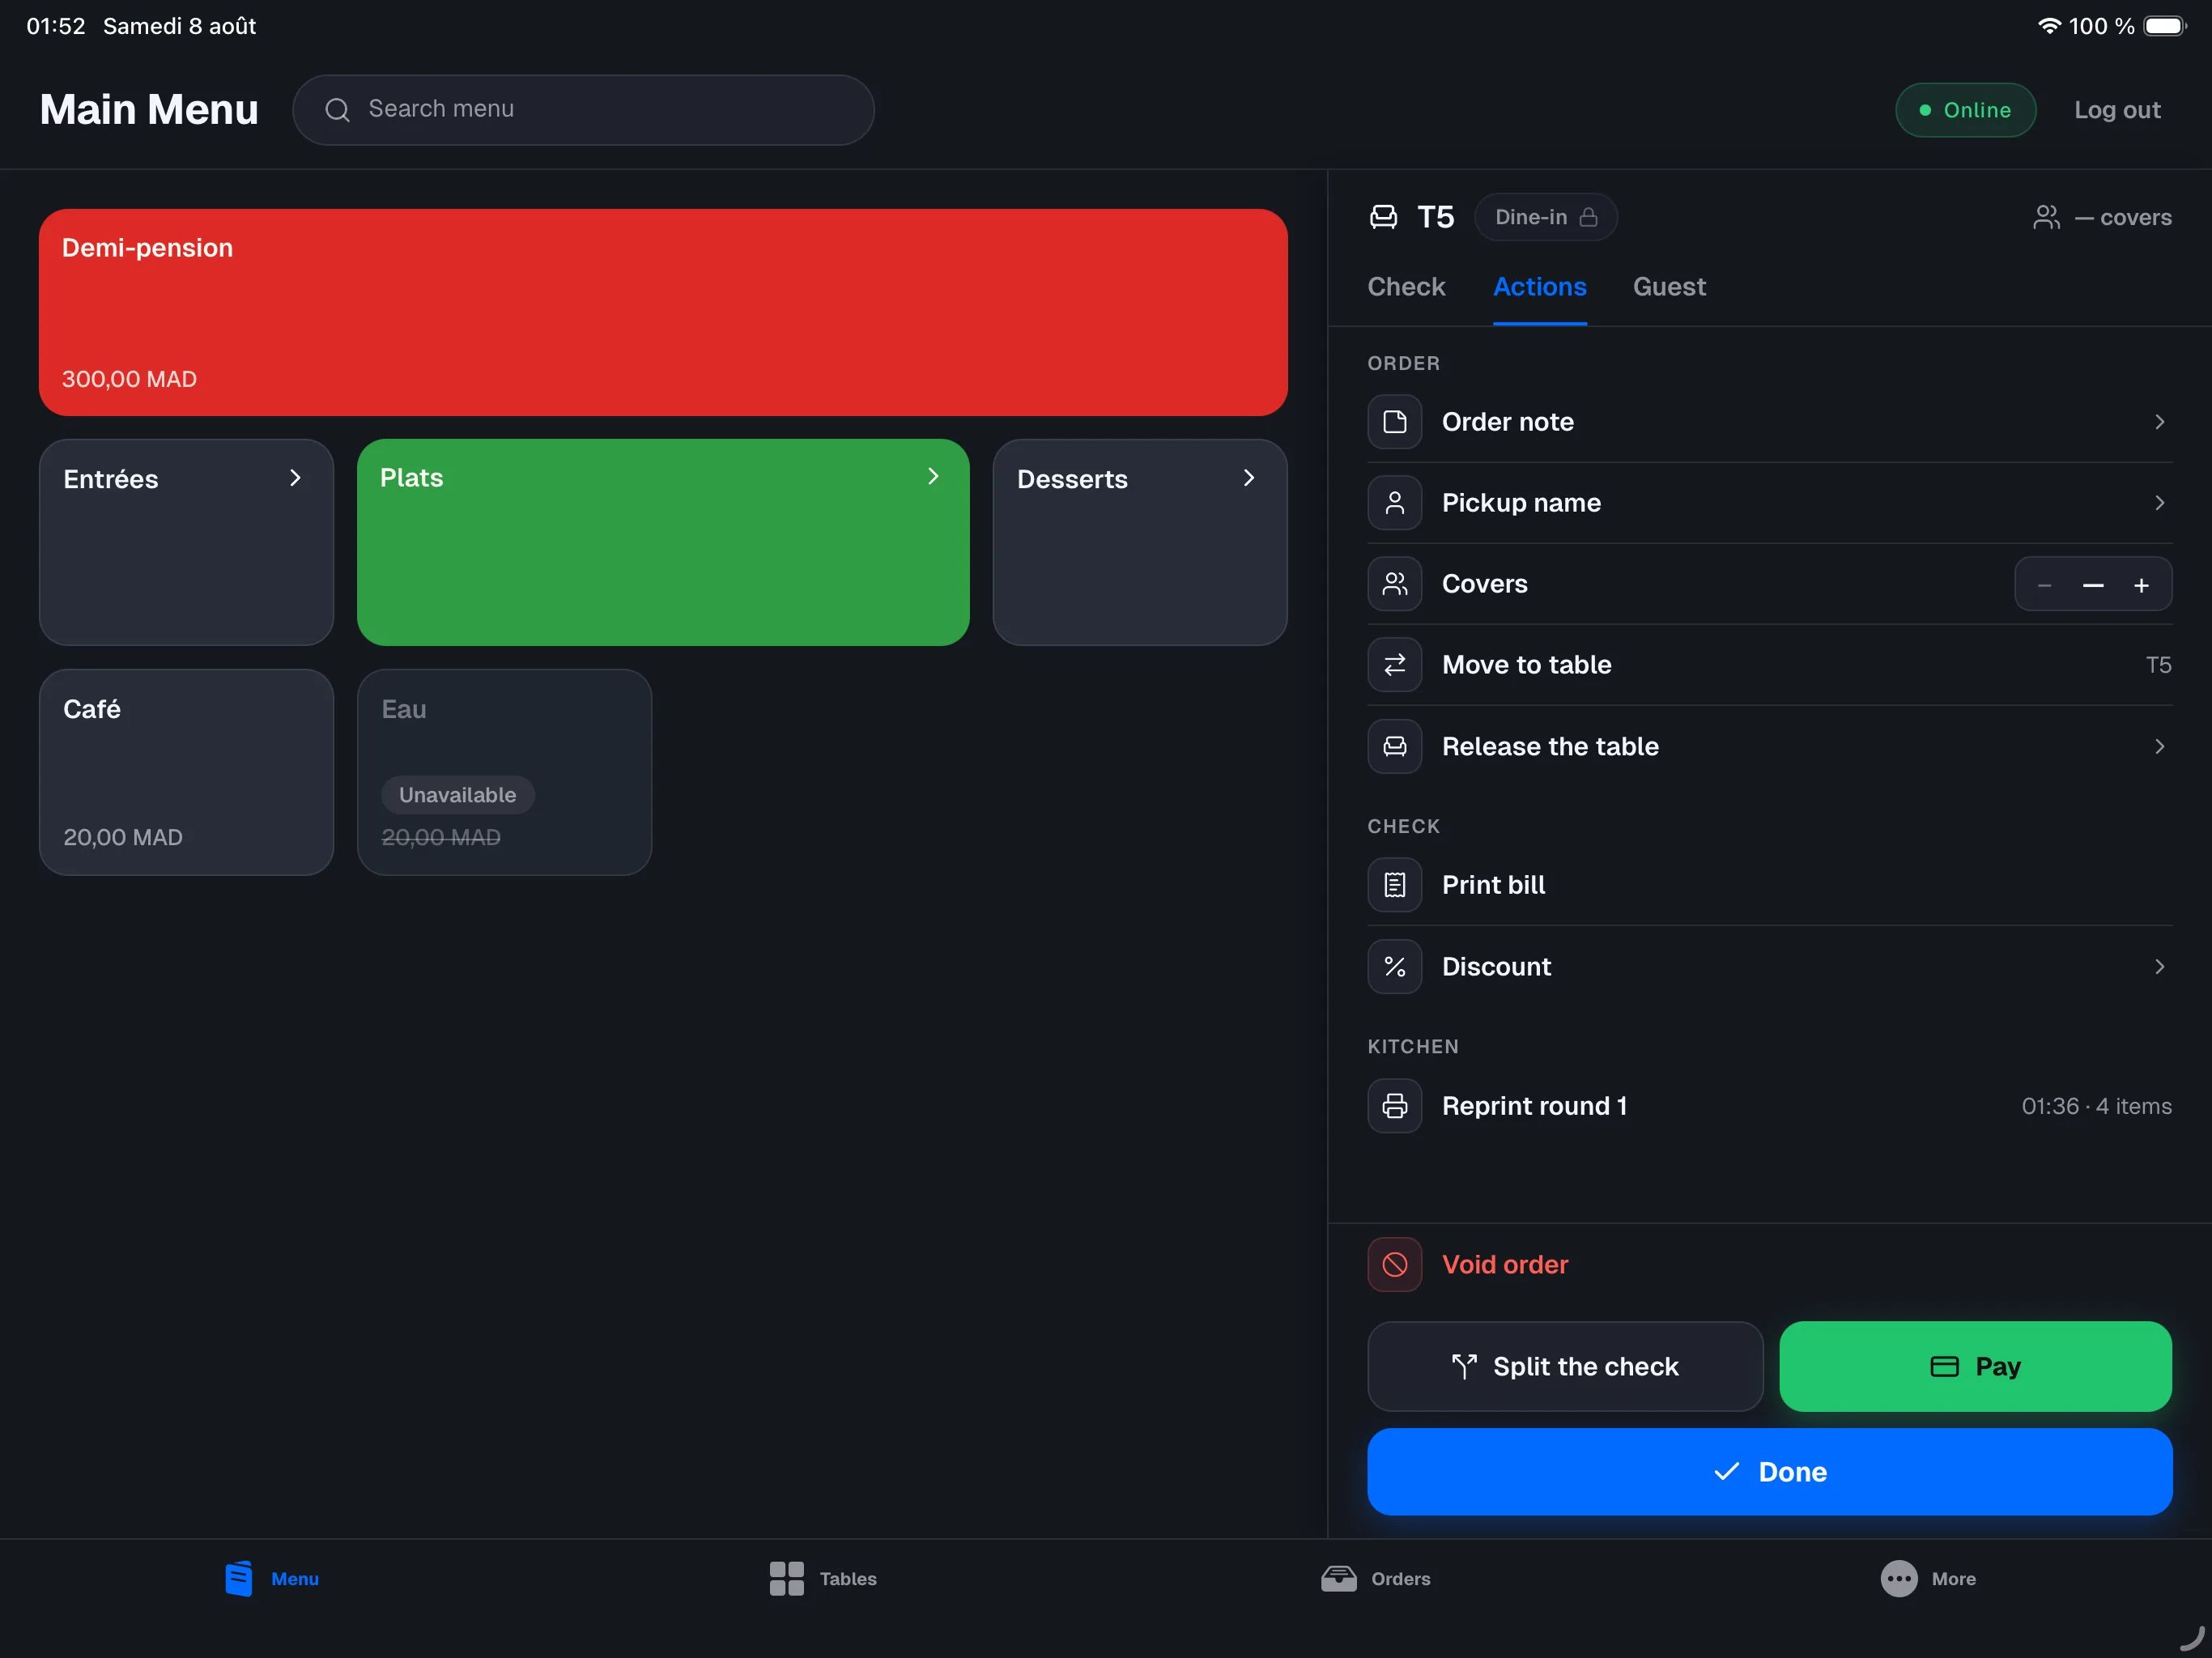
Open the order you want to pay. At the bottom of the order panel, you see
the Split, Pay and Send buttons.
2
Send items to the kitchen
The Pay and Split buttons stay dimmed until at least one item has
been sent to the kitchen. Tap Send first if items are still waiting.
3
Tap Pay
The Take payment screen opens full screen: the list of items on the
left, the payment controls on the right.
When you select only some of the items, the register gives them their own
check and that is the one you settle. The remaining items move to a separate
check that carries no payment at all, so you can keep splitting it between
the remaining guests. This is the recommended way to cash out a guest who
leaves before the others.
If this is the first payment of the day and the business day is not open yet,
the register prompts you to run start of day first. See Start of
day.
In retail mode
Tap the Pay button under the cart — it shows the total to charge directly. The pay screen opens: the check on the left (the Due amount in large type, the tax breakdown, payments already recorded), the payment controls on the right.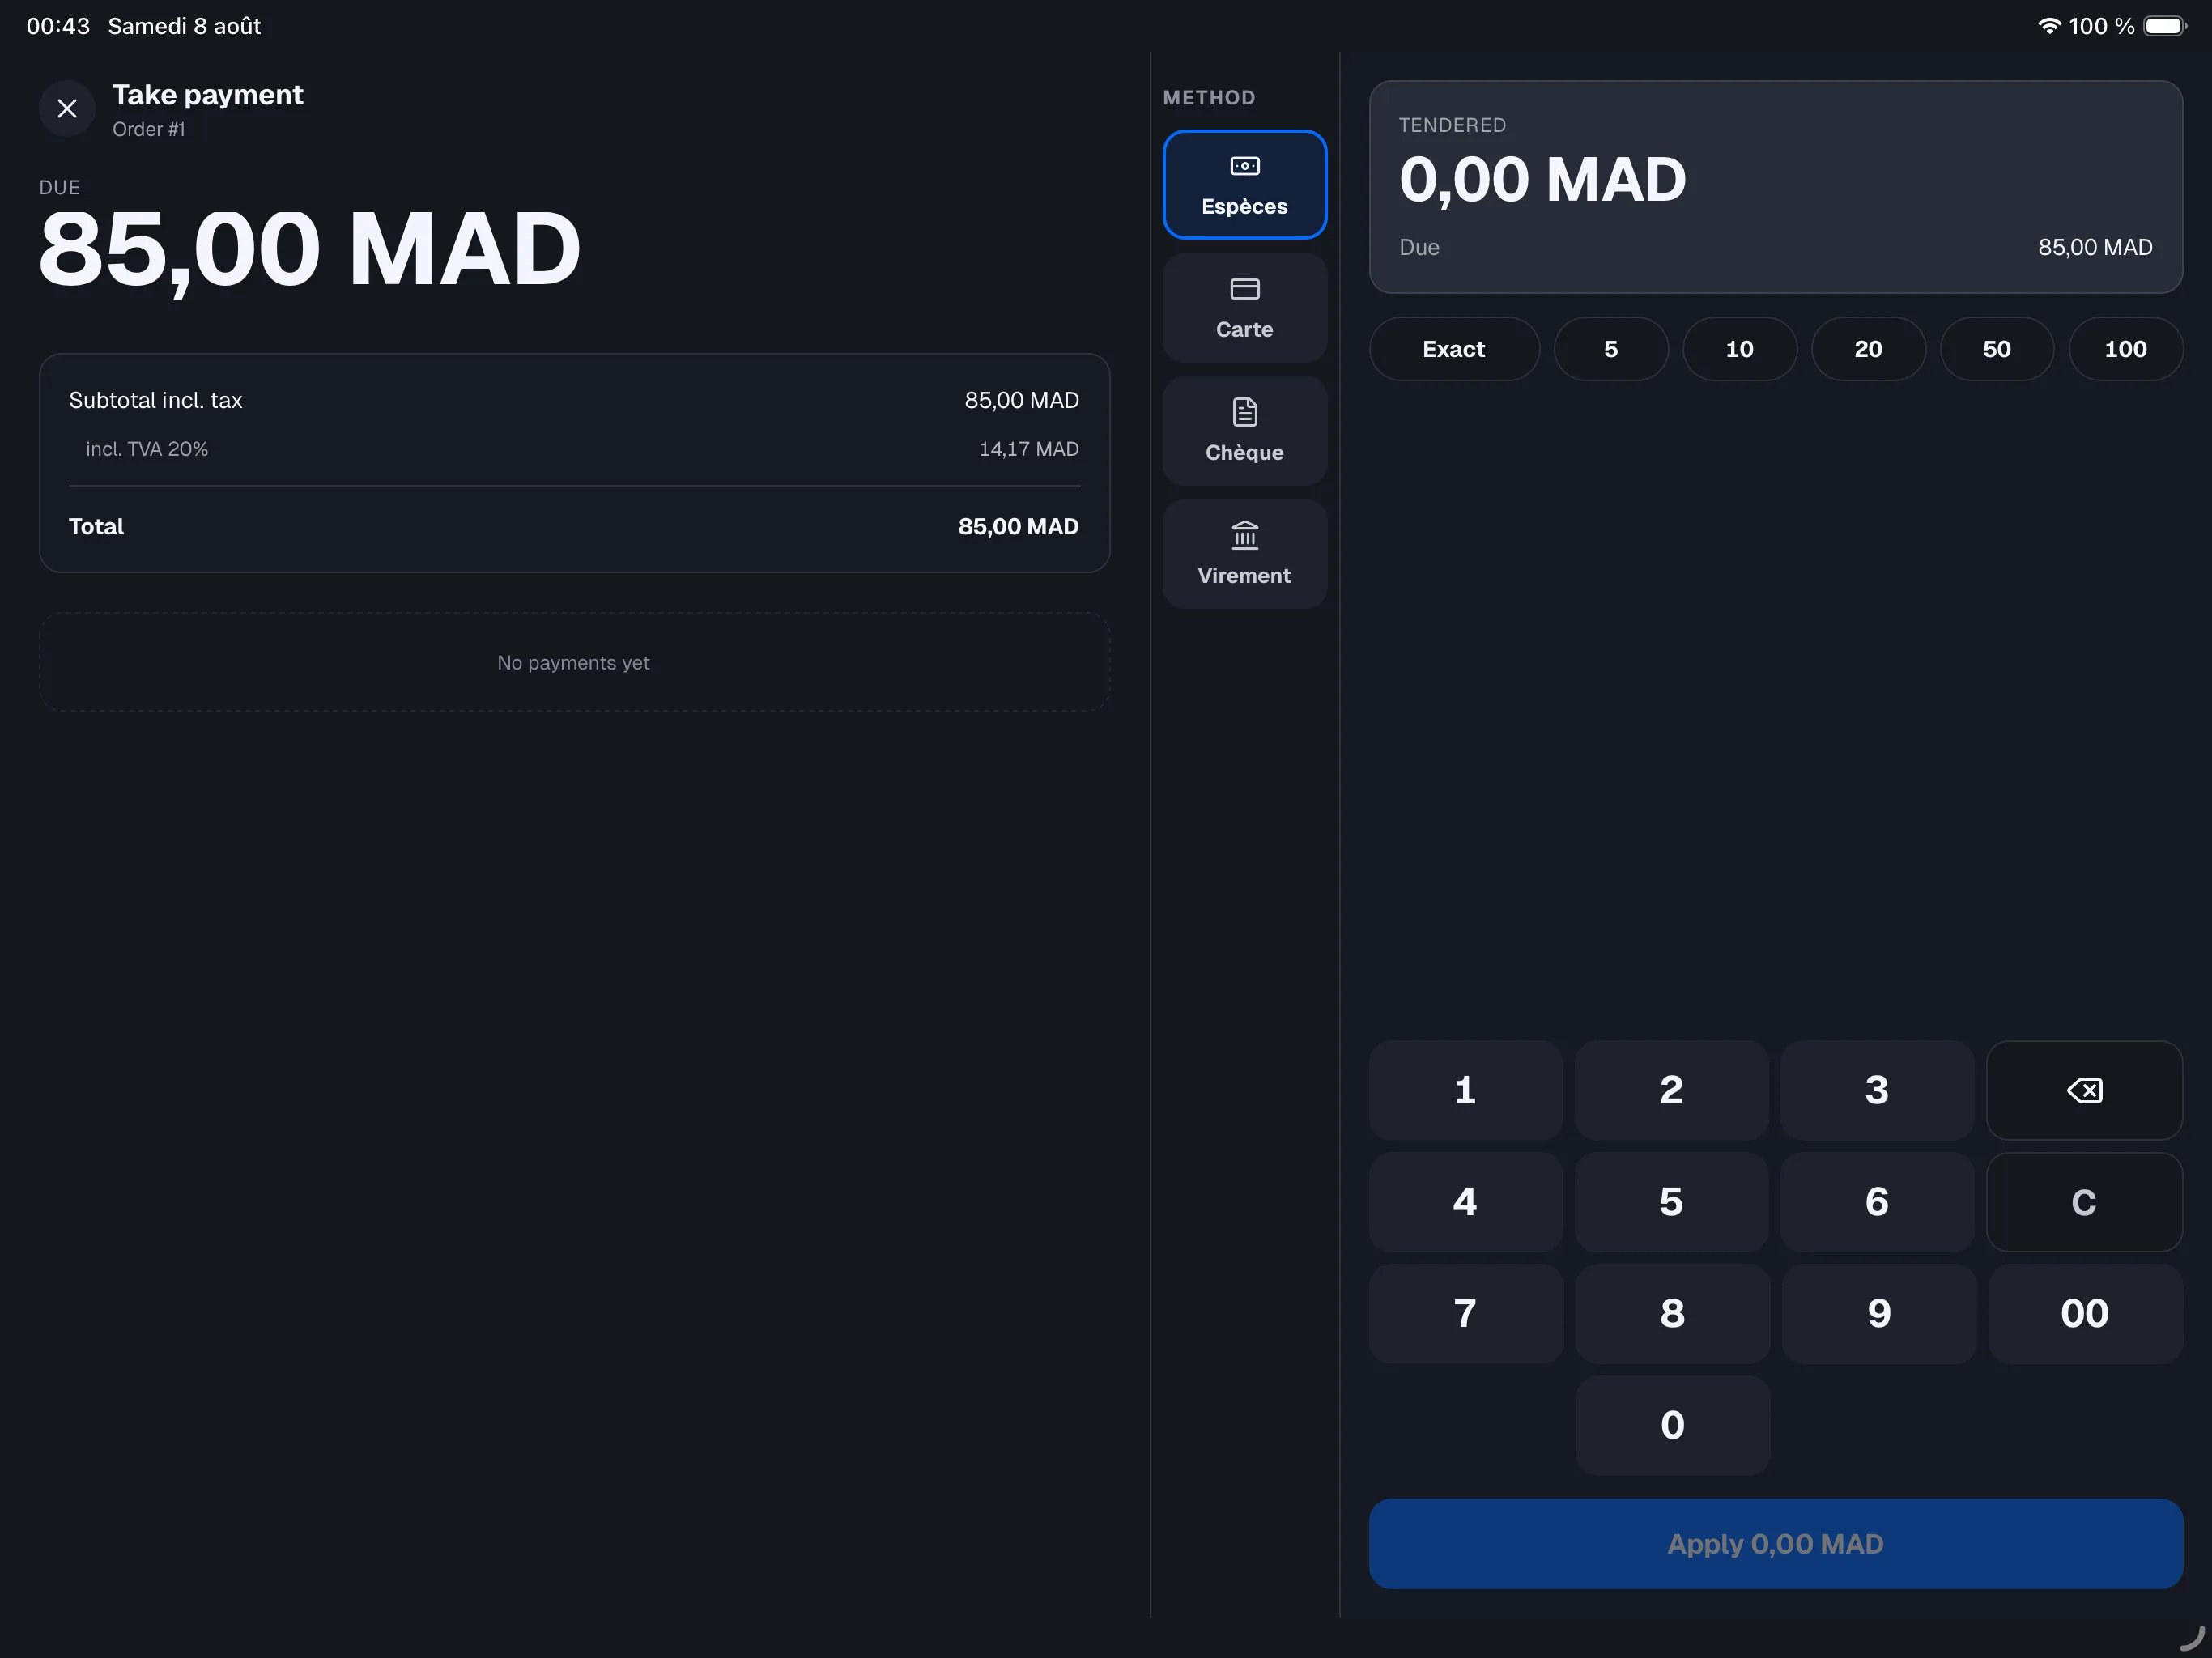
Choosing the payment method
The right-hand panel lists every payment method you have configured, in a column and in the order you chose: Cash, Card, Luncheon voucher, Cheque, Bank transfer… Tap the one the customer is using; the entry pad adapts to it. That list comes from the backoffice. To add, rename or reorder methods, see Payment methods.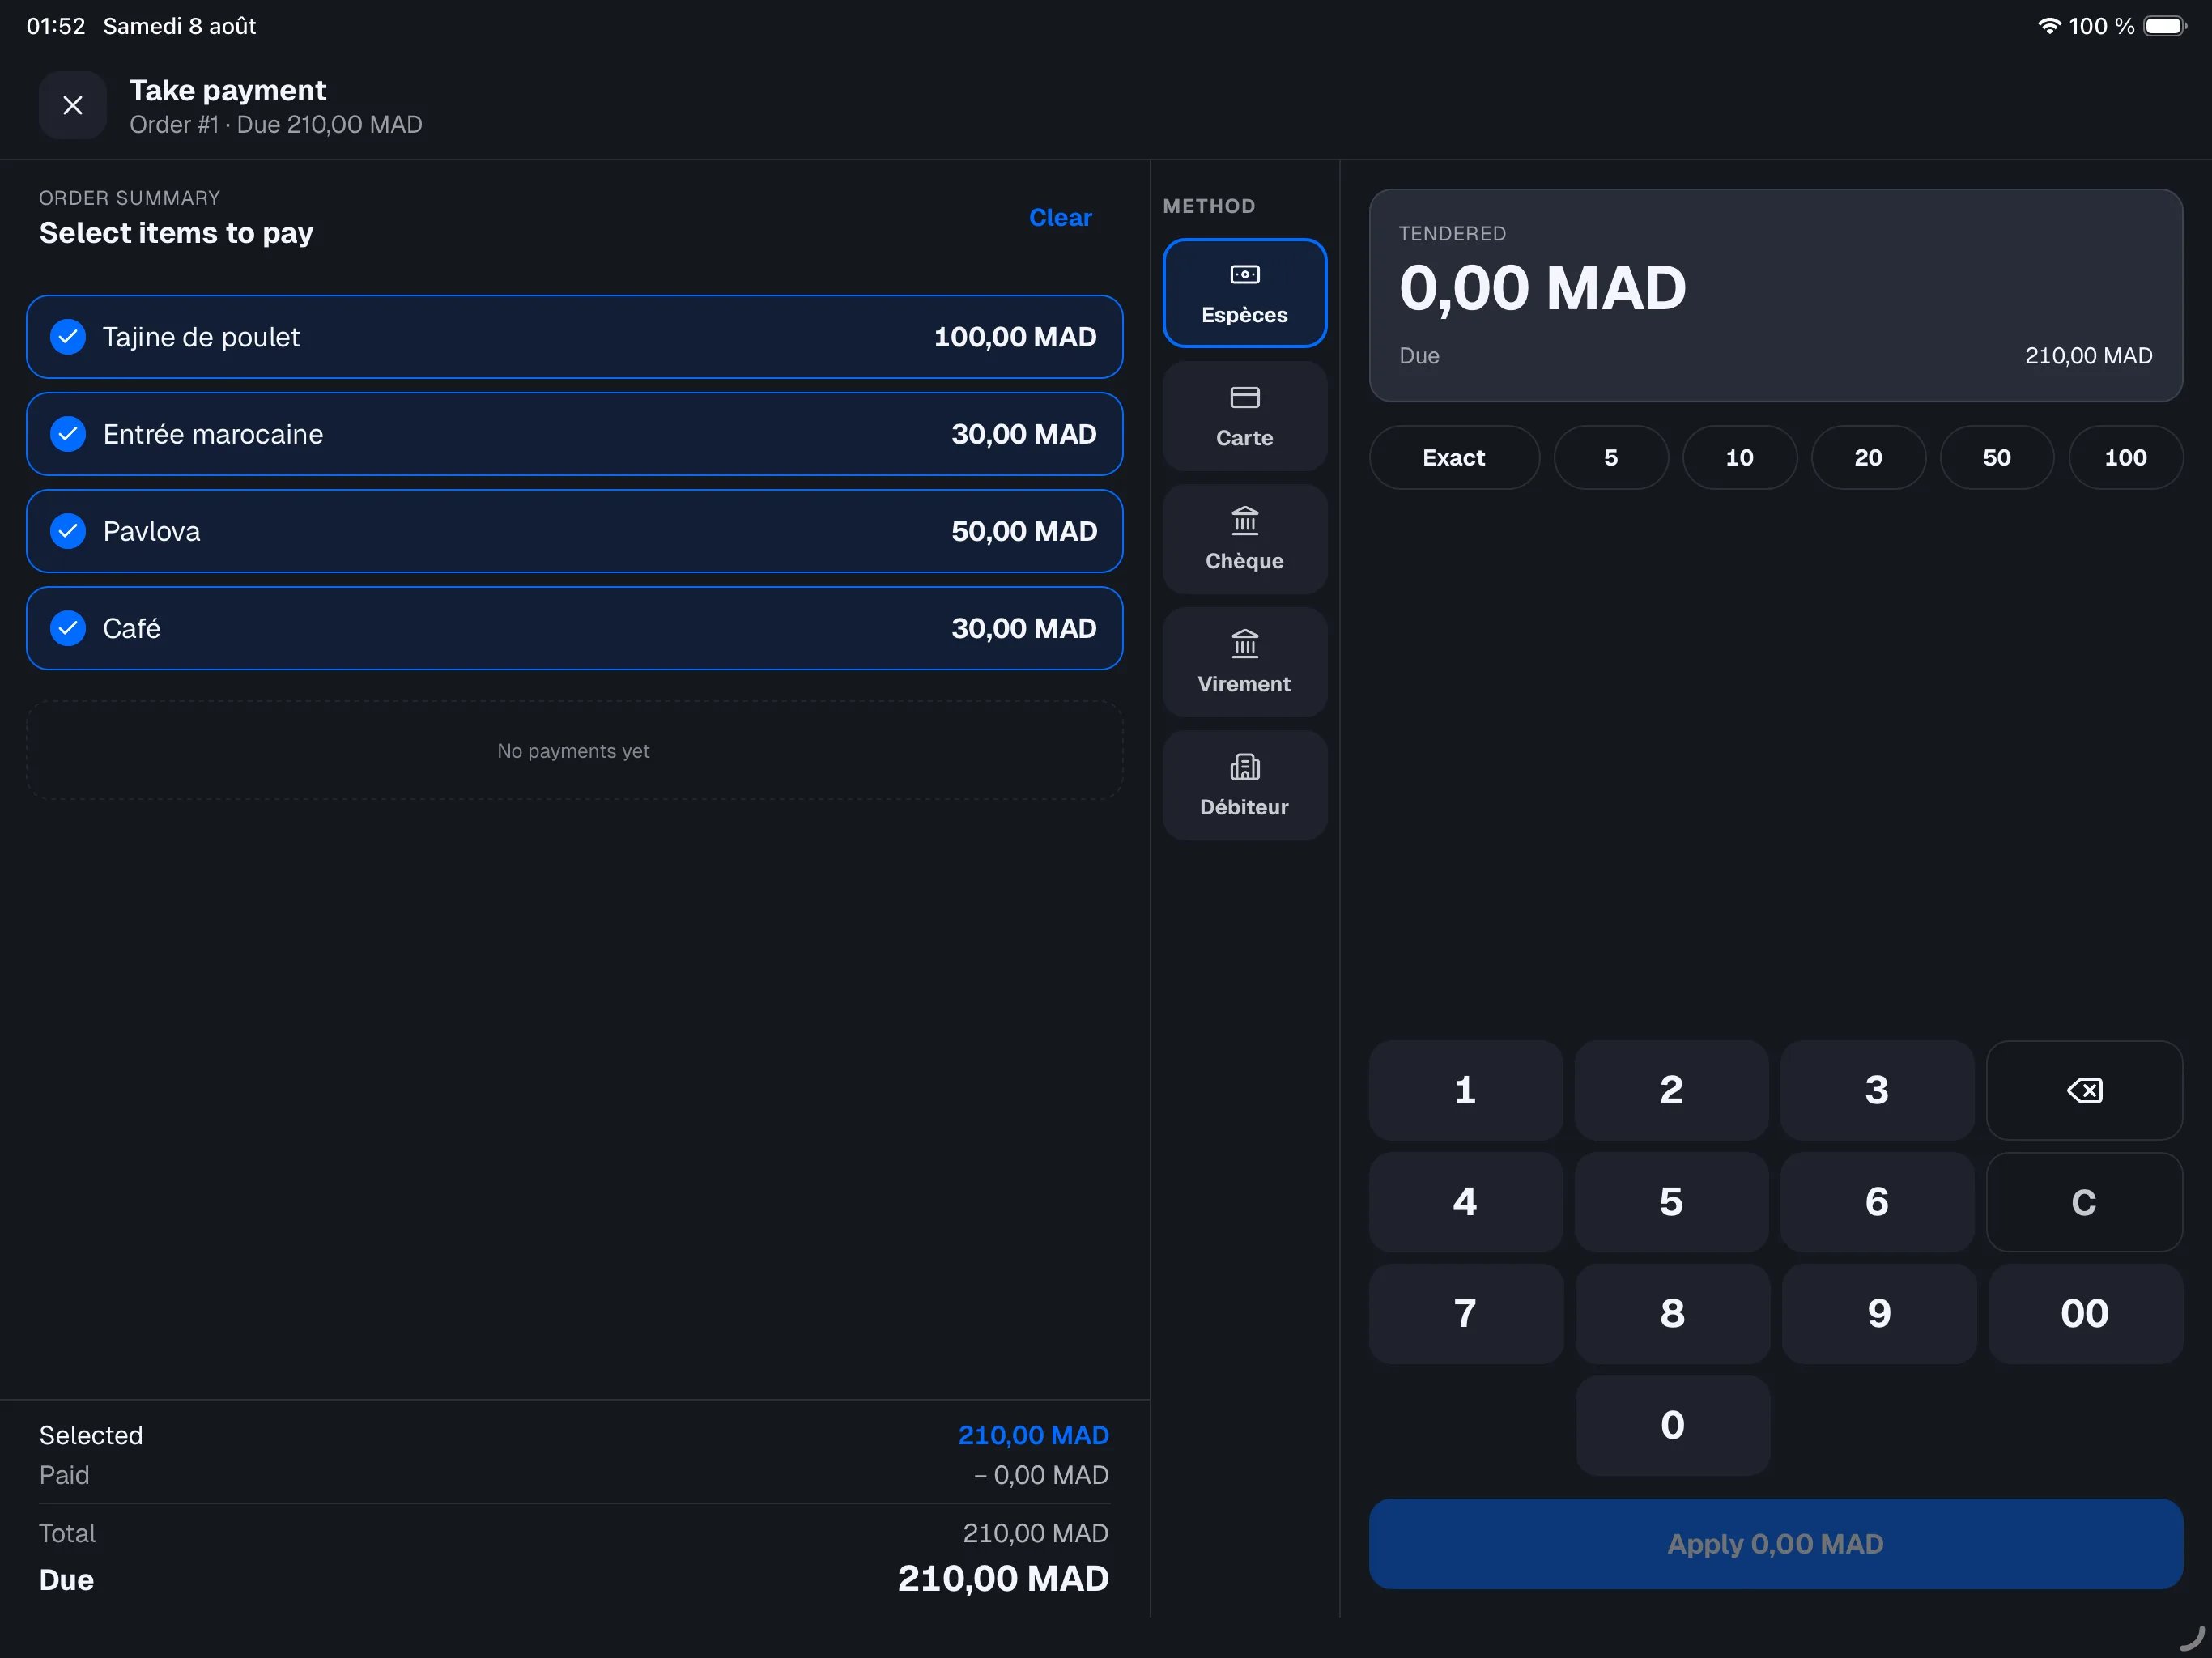
Taking luncheon vouchers
A voucher is counted in vouchers, not in money: the register asks which denomination, and how many the customer handed over.1
Pick the method
Tap Luncheon voucher in the payment-method column.
2
Pick the face value
Tap the value printed on the vouchers (€7.00, €9.00, €11.00…). These come
from your configuration.
3
Enter how many
Use − and +. The register shows the total handed over at the top,
then what is Applied to the check and, where relevant, the Retained
overpayment.
4
Confirm
Tap Apply. The payment is recorded.
No change is given on a voucher. If the customer hands over more than the
amount due, the difference stays with you: that is the retained
overpayment. It shows in amber on the pad, on the receipt, and on its own
line of your Z report — it is never counted as revenue.
If the customer hands over one voucher too many, the register refuses and
says so: the button reads e.g. “2 vouchers too many”. Take them off with
− — the retained overpayment can never exceed the value of a single
voucher.
Paying by cheque or bank transfer
These work like a card: the amount due is pre-filled and you confirm it. They give no change and take no tip. A mistyped entry is corrected as record-only (see Correcting a payment): the register records that the line was wrong, without claiming the money came back.Paying with cash
1
Choose Cash
In the right pane, Cash is selected by default.
2
Enter the amount handed over
Type the amount the customer hands you — it appears under Tendered. You
can also tap a quick chip: Exact (the exact amount due) or a common bill
(5, 10, 20, 50, 100).
3
Check the change
If the customer gives more than the amount due, the register shows Change
owed: that is the change to hand back. The change is calculated for you.
4
Confirm
Tap Apply followed by the amount. The payment is recorded and the
Due amount updates.
If the customer gives less than the amount due, the register records what was
handed over and the check stays open for the balance. Simply take a second
payment for the rest — cash or card.
Paying by card
NowOS is not connected to the card terminal: you choose how much to charge (the bill, plus any tip), charge it on your usual terminal, then confirm in the register.1
Choose Card
In the right pane, tap Card. The Total on card and the keypad below
it are pre-filled with the amount due, and the tip is No tip.
2
Add a tip (optional)
Tap a percentage (10%, 15%, 20%, 25%) to set the total to
bill + that tip, or type the amount to charge directly on the keypad.
Anything above the bill becomes the tip — the Tip line and the Total
on card update as you go. Leave No tip to charge the bill exactly.
3
Charge the terminal
Charge the Total on card on your card terminal, as usual.
4
Confirm
Tap Apply followed by the total. The register records the bill and the
tip separately.
Typing less than the bill records a partial card payment (no tip) and the
check stays open for the rest — take a second payment for the balance.
The tip goes to your staff — it is never counted as a sale, never taxed,
and never shows up in your revenue. You’ll find the total tips collected in
the Payment methods and Staff performance reports.
Cash tips left on the table aren’t entered in the register.
Combining several payments
A single check can be settled in several payments: half cash, half card, for example. Record each payment one after the other — the Payments list and the Due amount update each time. As soon as the amount due reaches zero, the check closes automatically.Correcting a payment before the check closes
If a partial payment was entered with the wrong amount or tender, tap Correct on its row in the Payments list. Select the reason, record what happened to the money, then have a manager approve the correction.- For cash, confirm whether it was returned to the customer or only the NowOS entry was wrong.
- For card, void or refund it on the terminal first when needed, then record the action taken. NowOS does not operate or verify the external terminal.
Splitting the check (restaurant mode)
Splitting the check only exists in restaurant mode. Tap Split at the bottom of the order panel: the Split screen opens, with each check shown as a column (Check 1, Check 2…), its total and its own Pay button.Splitting evenly
Most of the time you simply want to split the check equally between the guests. When the Split screen opens, as long as you haven’t moved anything yet, a Split evenly shortcut appears, with a share count pre-filled from the table’s covers.1
Adjust the number of shares
The stepper starts from the table’s covers. Change it if the number of
payers differs.
2
Tap the split button
The button shows the amount per check. The check is divided at once into
equal checks, ready to take payment.
Creating a check
Tap the Add check column on the right, or the + Check button at the top of the screen — it also works while the split-evenly shortcut fills the screen. An empty check has no minimum: you then move the items you want onto it. An empty check can be removed with Delete. Leaving one empty is harmless: a check with no items cannot be paid, so it is discarded on its own the moment you settle the last check that does have items. The order completes as normal and the table frees up.Moving items to another check
1
Select the items
Tap one or more items in their original check.
2
Tap Move here
On the destination check, tap Move here. The items change check and the
totals recalculate.
Splitting one item across several checks
For a dish shared between several guests:1
Tap Split on the item
Tap Split on the item’s line (or select items, then tap Split at the
bottom of their column).
2
Choose how many to share
If the item has a quantity above one, a large + / − counter appears at
the top of the dialog. It starts on the full quantity; turn it down to
share only part of it. The line under the counter reminds you how many
units stay on the original check.
3
Pick the checks
Tick at least two checks — you can also create one with Add check —
then tap Done.
With a discount applied. The discount follows the items: split or move as
usual, and each check keeps the share of the discount matching what it
receives. The table’s total does not change. The one exception is an item
where only part of it is discounted (say “2× Water, 1 on the house”):
nothing can say which unit keeps the benefit, so Split is unavailable on
that row. Remove the discount, split, then re-apply it on the right check.
- Enough units for every check — they are handed out as whole units, keeping their name. Six waters shared between two checks give “3× Water” on each side.
- Fewer units than checks — the price is fractionalised and each share displays as “1/N” followed by the item’s name. One water shared between two checks gives two “1/2 Water”.
This is how you bill one shared drink on a table that ordered several: on a
“6× Water” line, set the counter to 1 and tick both checks. The other
five waters stay on the original check, and only the sixth is halved.
Changing your mind: combining checks
Shares of the same item snap back together on their own: move a “1/2” share onto the check holding the other half, and the item becomes one whole line again — name, price to the cent and modifiers restored, exactly as before the split. Two thirds reunited display as “2/3” until the last one arrives. To put everything back in one go, tap Combine at the top of the screen: every item returns to the first available check, emptied checks are removed, and the note reads exactly as it did before the split. The Split evenly shortcut is offered again the next time you open the screen.A check that has already taken a payment is locked: its items stay put when
you combine. Correct the payment first if you really need to undo it.
Paying each check
Each column has its own Pay button, which opens the pay screen for that check only. This is how one guest can leave before the others: move their items onto a check, take its payment — their receipt is issued — and the order stays open for the rest of the table. The order is complete when every check is paid. A paid check displays with a Paid label: its items and amount are locked and it can no longer be changed.A partially paid check is locked
If a check has taken some money without being settled, the Split screen shows it with an already collected label and a Total / Paid / Due breakdown. Its items are dimmed: while that payment is on record they can no longer be moved or split, and the check cannot receive items from elsewhere either. Only Pay the rest stays available. To unlock it, tap Correct the payment on the column — that takes you to the correction described above. Once the payment is corrected, the check can be edited and split again.To avoid this lock, cash a guest out by selecting their items on the
payment screen rather than by typing a free amount: the register then gives
them their own check and leaves the rest of the table completely free.
When the check is fully paid
As soon as the payments cover the total, the check closes and the Payment complete screen appears: the amount collected, the item and tax breakdown, the list of payments, the tip and total paid when a tip was left, and the change handed back if any. The receipt prints automatically when a printer is set up — see Receipts and printing.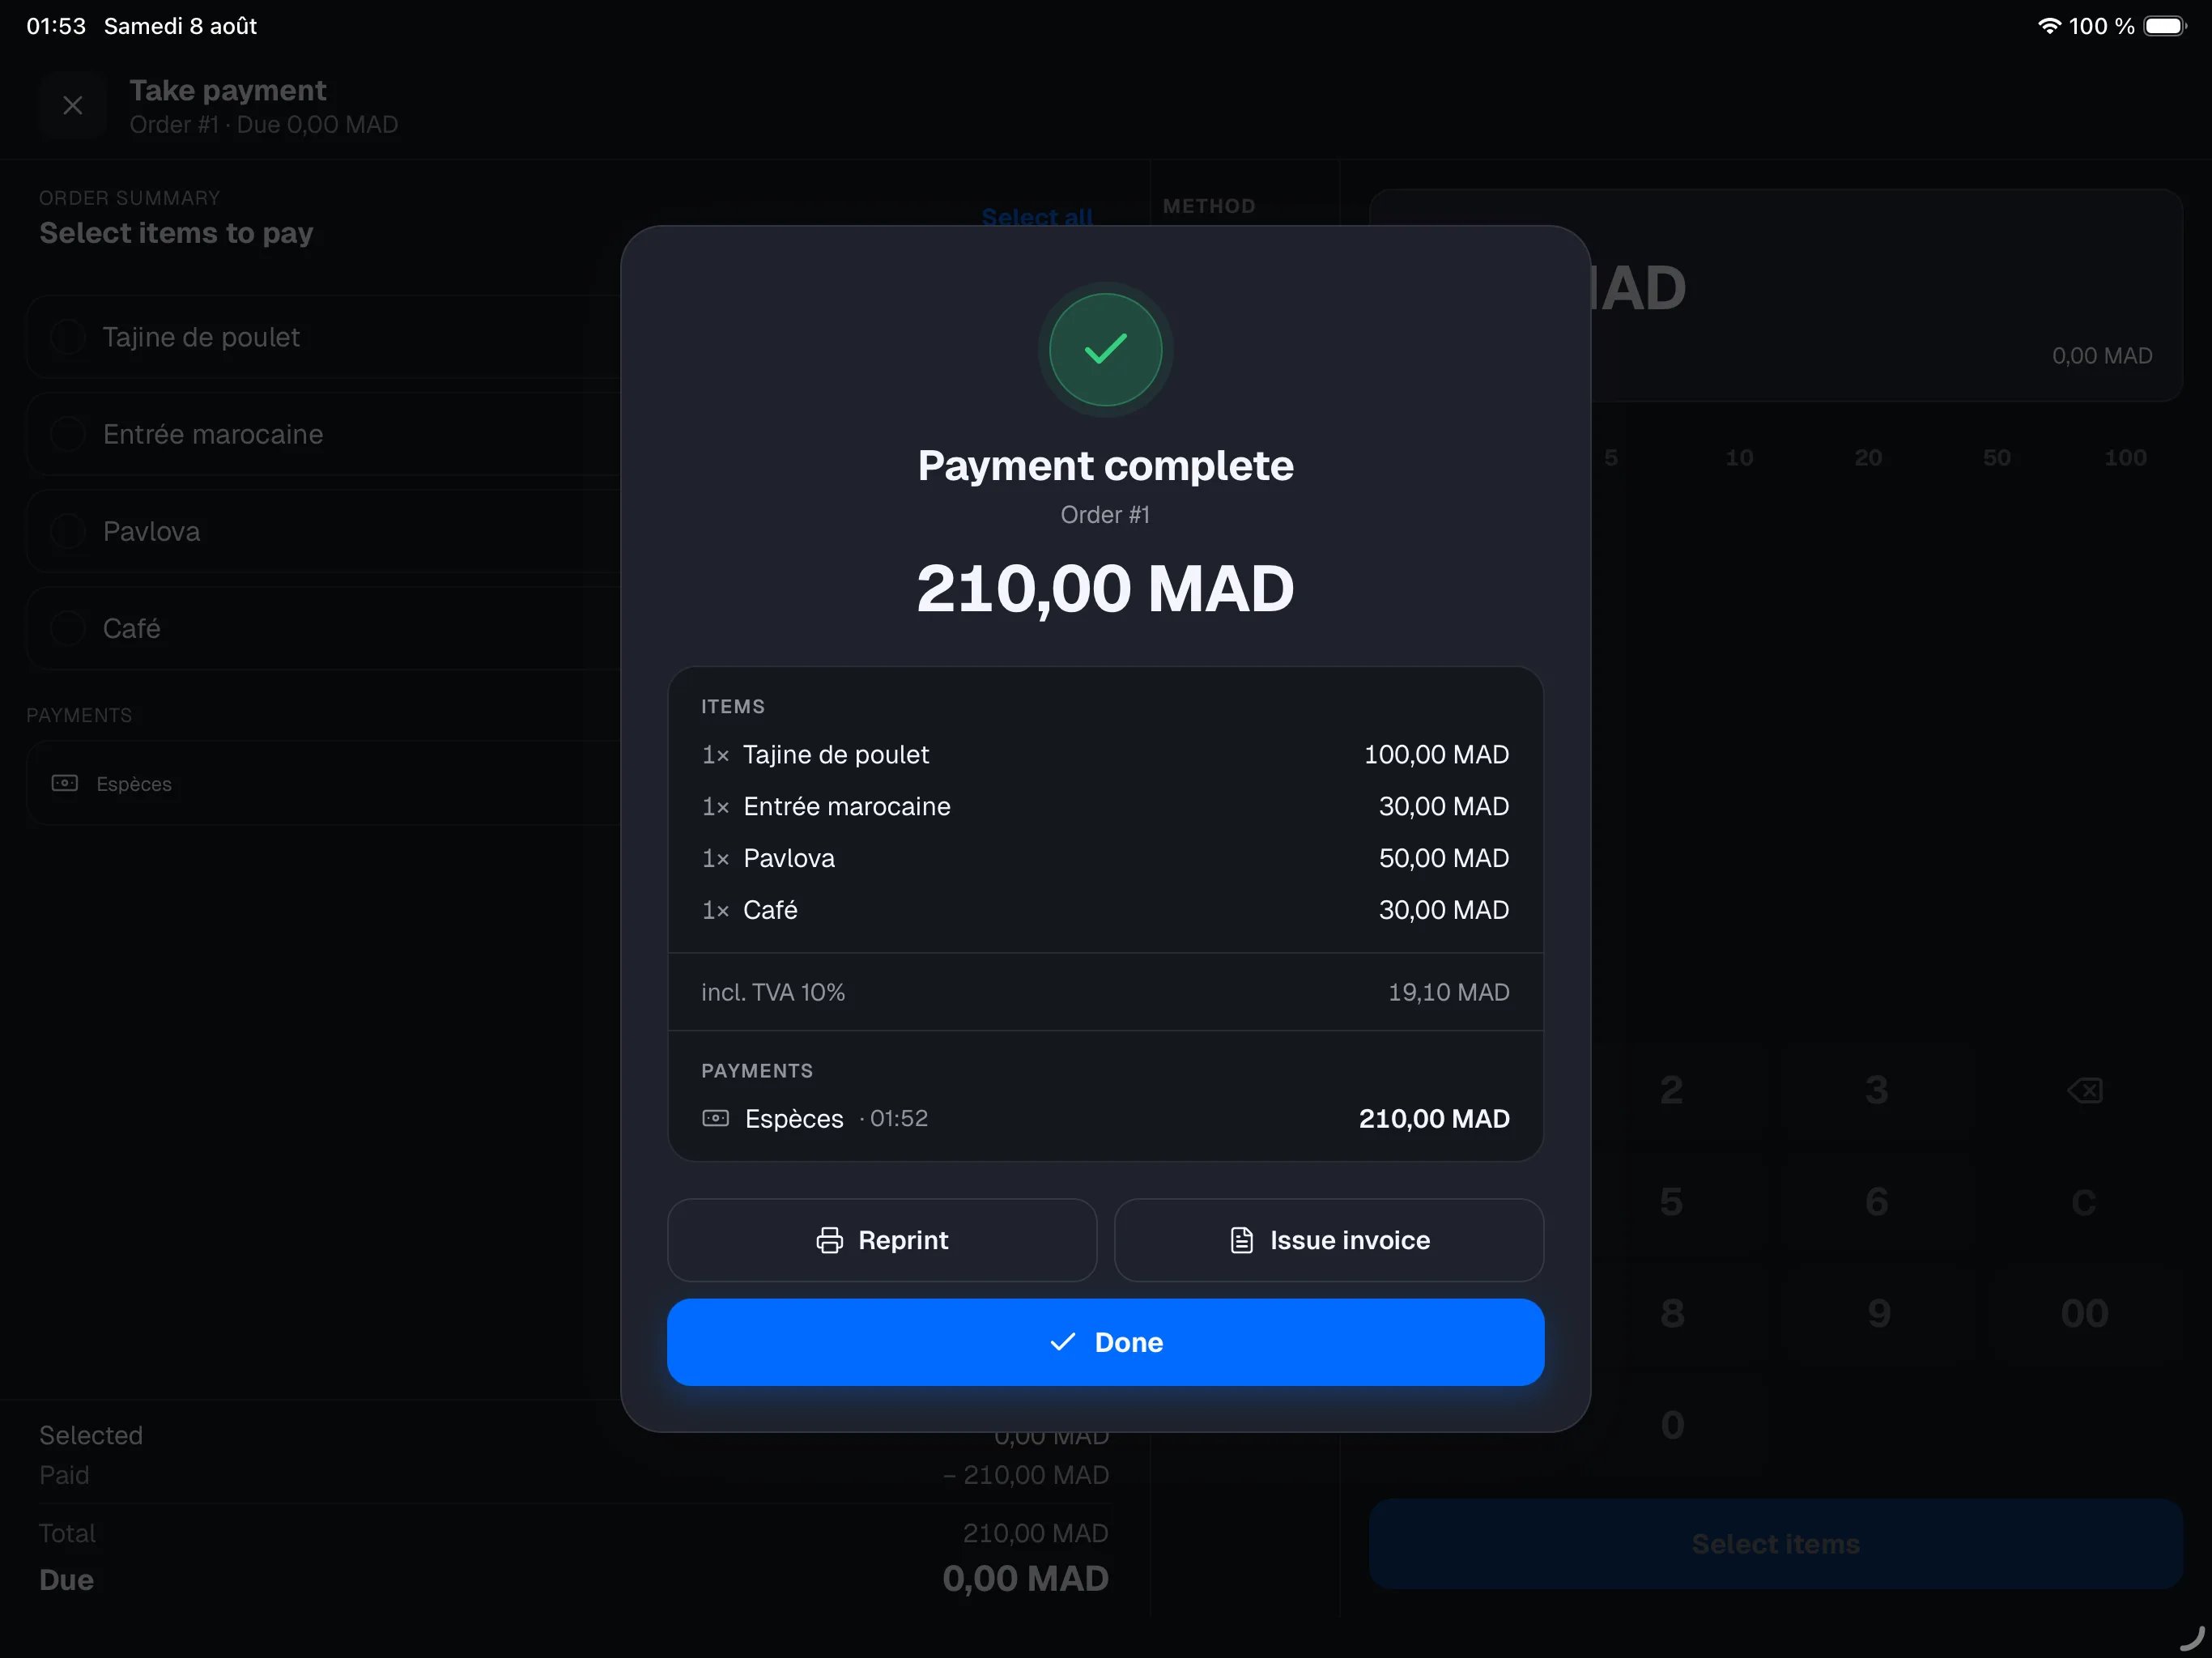
- Reprint — print the receipt again;
- Issue invoice — issue an invoice for this customer;
- Done — leave the settled sale.